consigli di pulizia
Cleaning tips | Conseils de nettoyage | Empfehlungen zum Säubern
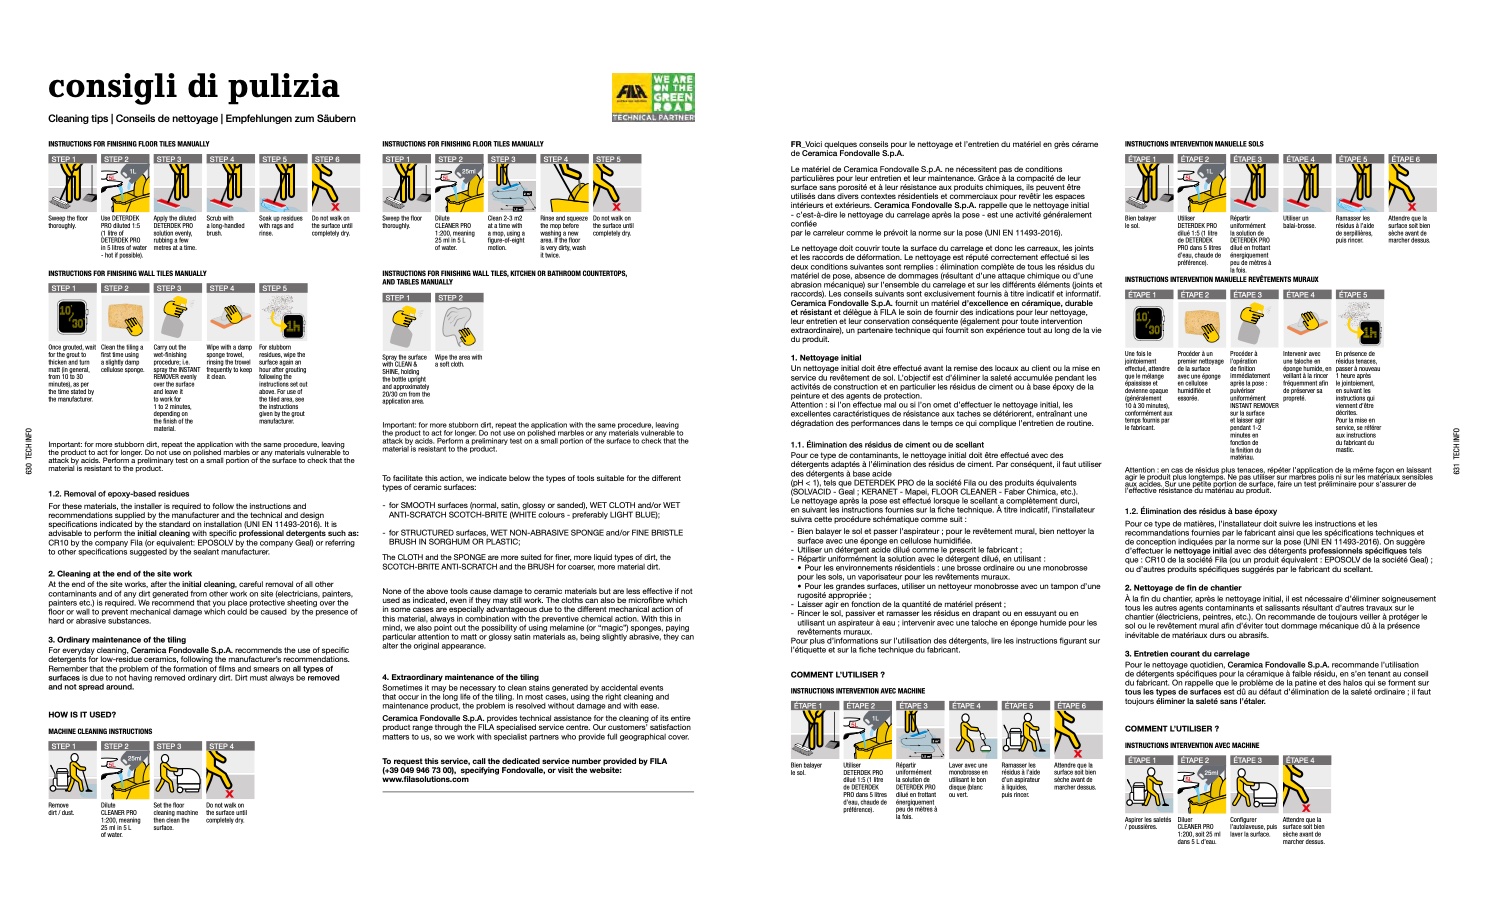
INSTRUCTIONS FOR FINISHING FLOOR TILES MANUALLY
INSTRUCTIONS FOR FINISHING FLOOR TILES MANUALLY
FR_Voici quelques conseils pour le nettoyage et l’entretien du matériel en grès cérame
de Ceramica Fondovalle S.p.A.
Le matériel de Ceramica Fondovalle S.p.A. ne nécessitent pas de conditions
particulières pour leur entretien et leur maintenance. Grâce à la compacité de leur
surface sans porosité et à leur résistance aux produits chimiques, ils peuvent être
utilisés dans divers contextes résidentiels et commerciaux pour revêtir les espaces
intérieurs et extérieurs. Ceramica Fondovalle S.p.A. rappelle que le nettoyage initial
- c’est-à-dire le nettoyage du carrelage après la pose - est une activité généralement
confiée
par le carreleur comme le prévoit la norme sur la pose (UNI EN 11493-2016).
Le nettoyage doit couvrir toute la surface du carrelage et donc les carreaux, les joints
et les raccords de déformation. Le nettoyage est réputé correctement effectué si les
deux conditions suivantes sont remplies : élimination complète de tous les résidus du
matériel de pose, absence de dommages (résultant d’une attaque chimique ou d’une
abrasion mécanique) sur l’ensemble du carrelage et sur les différents éléments (joints et
raccords). Les conseils suivants sont exclusivement fournis à titre indicatif et informatif.
Ceramica Fondovalle S.p.A. fournit un matériel d’excellence en céramique, durable
et résistant et délègue à FILA le soin de fournir des indications pour leur nettoyage,
leur entretien et leur conservation conséquente (également pour toute intervention
extraordinaire), un partenaire technique qui fournit son expérience tout au long de la vie
du produit.
1. Nettoyage initial
Un nettoyage initial doit être effectué avant la remise des locaux au client ou la mise en
service du revêtement de sol. L’objectif est d’éliminer la saleté accumulée pendant les
activités de construction et en particulier les résidus de ciment ou à base époxy de la
peinture et des agents de protection.
Attention : si l’on effectue mal ou si l’on omet d’effectuer le nettoyage initial, les
excellentes caractéristiques de résistance aux taches se détériorent, entraînant une
dégradation des performances dans le temps ce qui complique l’entretien de routine.
1.1. Élimination des résidus de ciment ou de scellant
Pour ce type de contaminants, le nettoyage initial doit être effectué avec des
détergents adaptés à l’élimination des résidus de ciment. Par conséquent, il faut utiliser
des détergents à base acide
(pH < 1), tels que DETERDEK PRO de la société Fila ou des produits équivalents
(SOLVACID - Geal ; KERANET - Mapei, FLOOR CLEANER - Faber Chimica, etc.).
Le nettoyage après la pose est effectué lorsque le scellant a complètement durci,
en suivant les instructions fournies sur la fiche technique. À titre indicatif, l’installateur
suivra cette procédure schématique comme suit :
- Bien balayer le sol et passer l’aspirateur ; pour le revêtement mural, bien nettoyer la
surface avec une éponge en cellulose humidifiée.
- Utiliser un détergent acide dilué comme le prescrit le fabricant ;
- Répartir uniformément la solution avec le détergent dilué, en utilisant :
• Pour les environnements résidentiels : une brosse ordinaire ou une monobrosse
pour les sols, un vaporisateur pour les revêtements muraux.
• Pour les grandes surfaces, utiliser un nettoyeur monobrosse avec un tampon d’une
rugosité appropriée ;
- Laisser agir en fonction de la quantité de matériel présent ;
- Rincer le sol, passiver et ramasser les résidus en drapant ou en essuyant ou en
utilisant un aspirateur à eau ; intervenir avec une taloche en éponge humide pour les
revêtements muraux.
Pour plus d’informations sur l’utilisation des détergents, lire les instructions figurant sur
l’étiquette et sur la fiche technique du fabricant.
INSTRUCTIONS INTERVENTION MANUELLE SOLS
STEP 1
Sweep the floor
thoroughly.
STEP 2
5L
1L
STEP 3
Apply the diluted
DETERDEK PRO
solution evenly,
rubbing a few
metres at a time.
STEP 4
Scrub with
a long-handled
brush.
STEP 5
Soak up residues
with rags and
rinse.
STEP 5
For stubborn
residues, wipe the
surface again an
hour after grouting
following the
instructions set out
above. For use of
the tiled area, see
the instructions
given by the grout
manufacturer.
STEP 6
Do not walk on
the surface until
completely dry.
Use DETERDEK
PRO diluted 1:5
(1 litre of
DETERDEK PRO
in 5 litres of water
- hot if possible).
Sweep the floor
thoroughly.
Dilute
CLEANER PRO
1:200, meaning
25 ml in 5 L
of water.
Clean 2-3 m2
at a time with
a mop, using a
figure-of-eight
motion.
Bien balayer
le sol.
Utiliser
DETERDEK PRO
dilué 1:5 (1 litre
de DETERDEK
PRO dans 5 litres
d’eau, chaude de
préférence).
Répartir
INSTRUCTIONS FOR FINISHING WALL TILES MANUALLY
INSTRUCTIONS FOR FINISHING WALL TILES, KITCHEN OR BATHROOM COUNTERTOPS,
AND TABLES MANUALLY
INSTRUCTIONS INTERVENTION MANUELLE REVÊTEMENTS MURAUX
STEP 1
Once grouted, wait
for the grout to
thicken and turn
matt (in general,
from 10 to 30
minutes), as per
the time stated by
the manufacturer.
STEP 2
Clean the tiling a
first time using
a slightly damp
cellulose sponge.
STEP 3
Carry out the
wet-finishing
procedure; i.e.
spray the INSTANT
REMOVER evenly
over the surface
and leave it
to work for
1 to 2 minutes,
depending on
the finish of the
material.
STEP 4
Wipe with a damp
sponge trowel,
rinsing the trowel
frequently to keep
it clean.
Spray the surface
with CLEAN &
SHINE, holding
the bottle upright
and approximately
20/30 cm from the
application area.
Wipe the area with
a soft cloth.
Une fois le
jointoiement
effectué, attendre
que le mélange
épaississe et
devienne opaque
(généralement
10 à 30 minutes),
conformément aux
temps fournis par
le fabricant.
Procéder à un
premier nettoyage
de la surface
avec une éponge
en cellulose
humidifiée et
essorée.
Procéder à
l’opération
de finition
immédiatement
après la pose :
pulvériser
uniformément
INSTANT REMOVER
sur la surface
et laisser agir
pendant 1-2
minutes en
fonction de
la finition du
matériau.
Intervenir avec
une taloche en
éponge humide, en
veillant à la rincer
fréquemment afin
de préserver sa
propreté.
Important: for more stubborn dirt, repeat the application with the same procedure, leaving
the product to act for longer. Do not use on polished marbles or any materials vulnerable to
attack by acids. Perform a preliminary test on a small portion of the surface to check that the
material is resistant to the product.
1.2. Removal of epoxy-based residues
For these materials, the installer is required to follow the instructions and
recommendations supplied by the manufacturer and the technical and design
specifications indicated by the standard on installation (UNI EN 11493-2016). It is
advisable to perform the initial cleaning with specific professional detergents such as:
CR10 by the company Fila (or equivalent: EPOSOLV by the company Geal) or referring
to other specifications suggested by the sealant manufacturer.
2. Cleaning at the end of the site work
At the end of the site works, after the initial cleaning, careful removal of all other
contaminants and of any dirt generated from other work on site (electricians, painters,
painters etc.) is required. We recommend that you place protective sheeting over the
floor or wall to prevent mechanical damage which could be caused by the presence of
hard or abrasive substances.
3. Ordinary maintenance of the tiling
For everyday cleaning, Ceramica Fondovalle S.p.A. recommends the use of specific
detergents for low-residue ceramics, following the manufacturer’s recommendations.
Remember that the problem of the formation of films and smears on all types of
surfaces is due to not having removed ordinary dirt. Dirt must always be removed
and not spread around.
Important: for more stubborn dirt, repeat the application with the same procedure, leaving
the product to act for longer. Do not use on polished marbles or any materials vulnerable to
attack by acids. Perform a preliminary test on a small portion of the surface to check that the
material is resistant to the product.
To facilitate this action, we indicate below the types of tools suitable for the different
types of ceramic surfaces:
- for SMOOTH surfaces (normal, satin, glossy or sanded), WET CLOTH and/or WET
ANTI-SCRATCH SCOTCH-BRITE (WHITE colours - preferably LIGHT BLUE);
- for STRUCTURED surfaces, WET NON-ABRASIVE SPONGE and/or FINE BRISTLE
BRUSH IN SORGHUM OR PLASTIC;
The CLOTH and the SPONGE are more suited for finer, more liquid types of dirt, the
SCOTCH-BRITE ANTI-SCRATCH and the BRUSH for coarser, more material dirt.
None of the above tools cause damage to ceramic materials but are less effective if not
used as indicated, even if they may still work. The cloths can also be microfibre which
in some cases are especially advantageous due to the different mechanical action of
this material, always in combination with the preventive chemical action. With this in
mind, we also point out the possibility of using melamine (or “magic”) sponges, paying
particular attention to matt or glossy satin materials as, being slightly abrasive, they can
alter the original appearance.
4. Extraordinary maintenance of the tiling
Sometimes it may be necessary to clean stains generated by accidental events
that occur in the long life of the tiling. In most cases, using the right cleaning and
maintenance product, the problem is resolved without damage and with ease.
Ceramica Fondovalle S.p.A. provides technical assistance for the cleaning of its entire
product range through the FILA specialised service centre. Our customers’ satisfaction
matters to us, so we work with specialist partners who provide full geographical cover.
To request this service, call the dedicated service number provided by FILA
(+39 049 946 73 00), specifying Fondovalle, or visit the website:
www.filasolutions.com
COMMENT L’UTILISER ?
INSTRUCTIONS INTERVENTION AVEC MACHINE
Attention : en cas de résidus plus tenaces, répéter l’application de la même façon en laissant
agir le produit plus longtemps. Ne pas utiliser sur marbres polis ni sur les matériaux sensibles
aux acides. Sur une petite portion de surface, faire un test préliminaire pour s’assurer de
l’effective résistance du matériau au produit.
1.2. Élimination des résidus à base époxy
Pour ce type de matières, l’installateur doit suivre les instructions et les
recommandations fournies par le fabricant ainsi que les spécifications techniques et
de conception indiquées par la norme sur la pose (UNI EN 11493-2016). On suggère
d’effectuer le nettoyage initial avec des détergents professionnels spécifiques tels
que : CR10 de la société Fila (ou un produit équivalent : EPOSOLV de la société Geal) ;
ou d’autres produits spécifiques suggérés par le fabricant du scellant.
2. Nettoyage de fin de chantier
À la fin du chantier, après le nettoyage initial, il est nécessaire d’éliminer soigneusement
tous les autres agents contaminants et salissants résultant d’autres travaux sur le
chantier (électriciens, peintres, etc.). On recommande de toujours veiller à protéger le
sol ou le revêtement mural afin d’éviter tout dommage mécanique dû à la présence
inévitable de matériaux durs ou abrasifs.
3. Entretien courant du carrelage
Pour le nettoyage quotidien, Ceramica Fondovalle S.p.A. recommande l’utilisation
de détergents spécifiques pour la céramique à faible résidu, en s’en tenant au conseil
du fabricant. On rappelle que le problème de la patine et des halos qui se forment sur
tous les types de surfaces est dû au défaut d’élimination de la saleté ordinaire ; il faut
toujours éliminer la saleté sans l’étaler.
HOW IS IT USED?
MACHINE CLEANING INSTRUCTIONS
ÉTAPE 1
Bien balayer
le sol.
ÉTAPE 2
Utiliser
DETERDEK PRO
dilué 1:5 (1 litre
de DETERDEK
PRO dans 5 litres
d’eau, chaude de
préférence).
ÉTAPE 3
Répartir
uniformément
la solution de
DETERDEK PRO
dilué en frottant
énergiquement
peu de mètres à
la fois.
ÉTAPE 4
Laver avec une
monobrosse en
utilisant le bon
disque (blanc
ou vert.
ÉTAPE 5
Ramasser les
résidus à l’aide
d’un aspirateur
à liquides,
puis rincer.
ÉTAPE 6
Attendre que la
surface soit bien
sèche avant de
marcher dessus.
COMMENT L’UTILISER ?
INSTRUCTIONS INTERVENTION AVEC MACHINE
STEP 1
Remove
dirt / dust.
STEP 2
Dilute
CLEANER PRO
1:200, meaning
25 ml in 5 L
of water.
STEP 3
Set the floor
cleaning machine
then clean the
surface.
STEP 4
Do not walk on
the surface until
completely dry.
ÉTAPE 1
Aspirer les saletés
/ poussières.
ÉTAPE 2
Diluer
CLEANER PRO
1:200, soit 25 ml
dans 5 L d’eau.
ÉTAPE 3
Configurer
l’autolaveuse, puis
laver la surface.
ÉTAPE 4
Attendre que la
surface soit bien
sèche avant de
marcher dessus.
Rinse and squeeze
the mop before
washing a new
area. If the floor
is very dirty, wash
it twice.
Do not walk on
the surface until
completely dry.
Utiliser un
uniformément
balai-brosse.
la solution de
DETERDEK PRO
dilué en frottant
énergiquement
peu de mètres à
la fois.
Ramasser les
résidus à l’aide
de serpillières,
puis rincer.
En présence de
résidus tenaces,
passer à nouveau
1 heure après
le jointoiement,
en suivant les
instructions qui
viennent d’être
décrites.
Pour la mise en
service, se référer
aux instructions
du fabricant du
mastic.
Attendre que la
surface soit bien
sèche avant de
marcher dessus.
STEP 1
STEP 2
STEP 3
STEP 4
STEP 5
25ml
5L
2 m
2
1,5 m
2
ÉTAPE 1
ÉTAPE 2
ÉTAPE 3
ÉTAPE 4
ÉTAPE 5
ÉTAPE 6
1L
5L
ÉTAPE 1
ÉTAPE 2
ÉTAPE 3
ÉTAPE 4
ÉTAPE 5
STEP 1
STEP 2
6
3
0
T
E
C
H
I
N
F
O
6
3
1
T
E
C
H
I
N
F
O
1L
5L
2 m
2
1,5 m
2
25ml
5L
25ml
5L

